 |
|||||
3: Modeling |
|||||
|
Let's start out by being real clear: I'm going to build a very simple model to work with. After we have the animation more or less done, you could swap it for a more complex and anatomically accurate by just changing which model the Shortcut in the Choreography points to. This model will be simple, meaning fast to build, fast to animate. We're going for results, not something that is going to fool the National Geographic people. I'm also going to assume you have at least read and understood the Basic Splinesmanship tutorials so you have a grasp on the tools. Let's start with head segment. In this case, the body is made of a simple arc which was extruded front and backwards then rotated forward (or back), scaled and tweaked. The legs are two segments each extruded from a simple four sided shape then rotated and tweaked. The eyes are simple spheres and the lids hemispheres with the central spline extruded and scaled. The mandibles are the same four-sided shape extruded and tweaked a couple times. Satisfied with this, I clicked on Model1, hit F2 and typed HeadSeg in the textbox to rename the model. 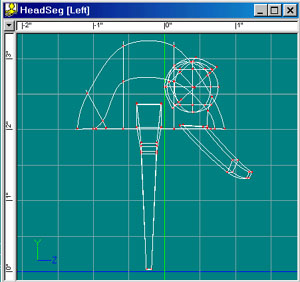
The body segment is a copy of the HeadSeg with the eyes and mandibles removed. The eyes have a simple decal for the cornea and pupil. The skin is a simple CellTurb combiner with two color attributes. Yes, this was rushed and lacks detail, but this isn't where the fun stuff is for the tutorial. (Plus you can download the project at the end and take that apart to your heart's content). Let's move on to the (even more basic) rigging. Here are some great tutorials to cover basic modeling: TinCan's Basic Splinemanship Tutorials. |
|||||
|
|||||
|
|
|||||
|
This document maintained by
webmaster@mossor.org. |
|||||