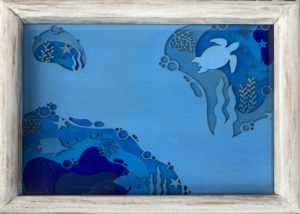
 This was a project I started a few months ago when I saw an image and thought, “Hey, I wonder if I could do something like that?” This thought formed the core of the “Learn a thing, Do a thing, Teach a thing” cycle. So, as an illustration of that and to share the results, I’ll write a bit about the project.
The two main things I needed to learn were what sort of material would work best for the layers and how best to create the design.
Second problem first, I spent some time learning a new piece of software. Since it was to facilitate a specific goal, this usually gives me a reason to learn a new piece of software. I’m not good if I just sit down with nothing specific in mind to accomplish. I’m much better if I’m trying to do a specific thing.
The most famous piece of design software for this kind of work is probably Adobe Illustrator but, because I’m unwilling to shell out a steep monthly fee, I found a great (for me) option: Affinity Designer. The major benefits to me are:
- It’s designed from the ground up for Mac, my preferred platform, and winner of the Apple Design Award, so it’s good stuff
- It’s a one-time cost versus a monthly fee
- It does 90%+ of what Illustrator can do and will be a really long time before I’m likely to run in to something it doesn’t do
Using a sketch of my design, I jumped in to learning enough to be dangerous about how to use Affinity Designer. This was important not only because it’s a solid tool to do Graphic Design (not anything I’m trained in, to be clear) but because one of the output formats of this tool provides the input format to the frickin’ laser that I would use to cut the layers.
After a fair bit of trial and error in the design phase, it was time to move to manufacture. This would initially be an attempt to cut the layers (six of them) out of 1/8″ baltic birch plywood. In the end, this was a bad idea as the resultant block of (layered) wood was pretty dang thick. More so than I wanted. Back to the drawing board. The next attempt was medium chipboard, the kind of cardboard you’d find on the back of a legal pad of paper. This turned out to be perfect and held the cuts and detail much better than I expected.
Once I had the layers cut, using my Glowforge, it was off to assembly. In this case that means doing some experiments with trying to get the right six colors that I liked for the layers, shooting for lightest on the top, descending to a cobalt blue at the bottom layer. That took some time. Mixing colors is hard when you have no experience. Turns out adding black or white to medium blue is … insufficient.
I also tried to use an airbrush for the first time and that was harder than I expected to get a clean, spot free and even finish. Definitely more work there to learn that tool better.
After I that I glued up the layers and then glued in the fish floating at the various levels.
The frame was purchased from Goodwill, sanded down and repainted for a more weathered look.
Major Learnings:
- Learning Affinity Designer
- More knowledge about the right (and wrong) materials
Mistakes
- I wasted material due to using thing plywood initially
- I should have been more careful because somehow I glued a couple layers in the wrong order, causing me to have to quickly pry them back apart, cut and paint another layer. And there was cursing. Much cursing.
Additional Work
I need to learn how to use (and clean and maintain) a airbrush better. It’s a mysterious tool right now and you can’t count on mysterious tools…
This was a fun project, albeit a bit frustrating in parts. I learned new things, I built on existing skills and I made a thing which pretty much reflected my original intent. This is not always the case.
Here’s a full-sized version of a picture of the result. It’s easier to spot issues/errors, that’s life. Note: The image is a bit skewed due to me trying to keep the camera out of the reflection and then trying to skew it back to rectangular. The circles really are circles.


0 Comments