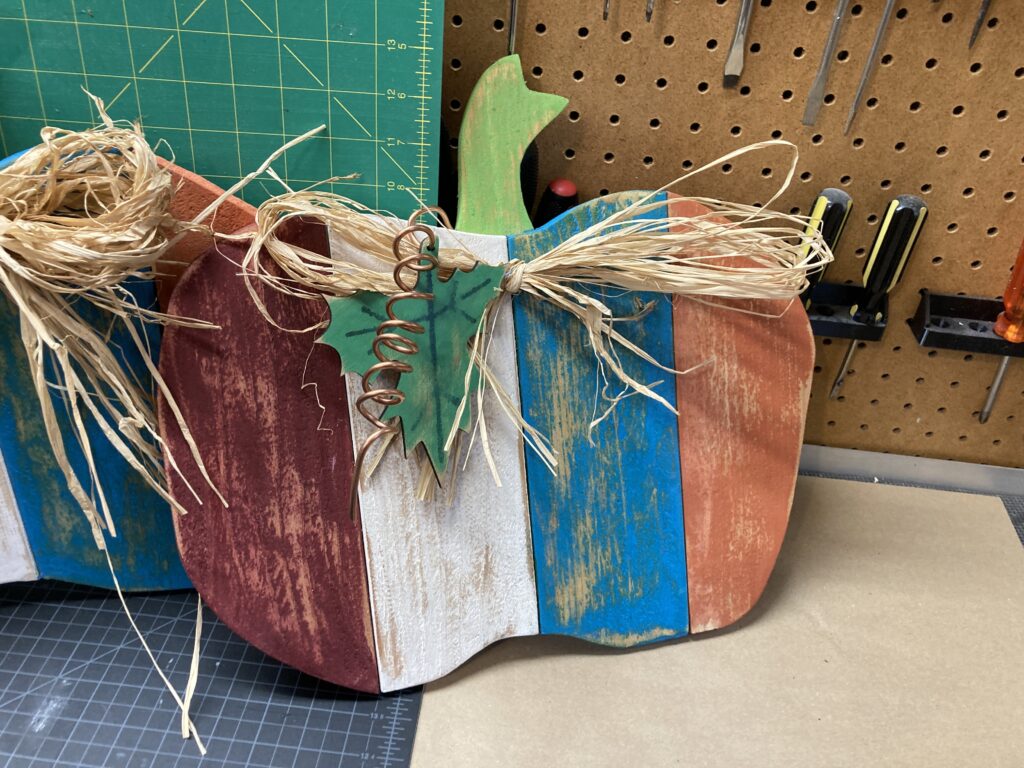
My lovely wife was visiting with a family friend and I wandered through the room and one of them asked, “Could you make something like this?” and showed me a picture of something off Pinterest. I looked at it and said, Sure! So, I did.
The original showed a very rough pumpkin shape with painted, weathered boards and some straw material in a bow. There was also some burlap attached around the outside. There were parts I liked and parts I didn’t care for, so I decided to remix and make my own take on the project.
The first step for me was to figure out what the materials were going to be. Most of it would be from cheap cedar boards. There was a curly, copper vine that I liked in the original, so I’d pick up some copper as well. I wasn’t even sure what the straw stuff was, but I’d work that out, probably with a trip to my local craft store.
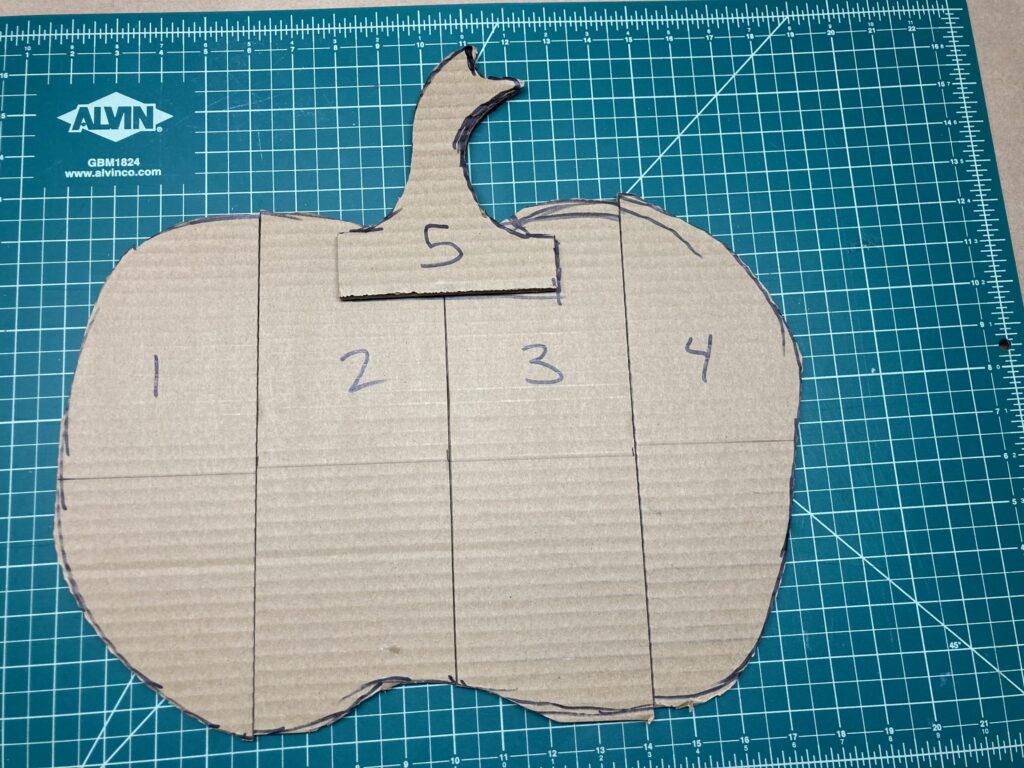
After that, it was time to mock up a template. A basic cedar board from a home improvement store is 6′ tall and 5.5″ wide. If I had four boards wide, I’d be looking at a piece that was 22″ wide. That felt a bit big, but the easy way to see for sure was to make up a prototype in cardboard which could also serve as a template. Sure enough, 22″ was too big, so that decision only cost me about 15 minutes of drawing, cutting and getting a second opinion. Then I settled on the width I thought would look good, which is 4″ boards, which would mean I’d rip the cedar boards to 4″.
With a little forethought, I was able to get all the wood for the project out of a single board, including the cross pieces which sit behind the vertical boards for support. They were simply made from the extra 1.5″ I cut off the side of the board. The step was cut from the top portion of the unripped board. The template looks like this:

At this point, I gave the front of the boards a quick sanding and then marked the template shapes on them and cut them with the jigsaw. I decided to make four of them because I was giving one to our family friend, keeping one and we could give away a couple as seasonal gifts. So, I cut up four cedar boards and marked the pieces with pencil with their number to make easy assembly. I also cut the cross pieces from the remainders.
It was time to think about painting and I didn’t have quite the right colors, so that meant a trip to our local craft store. The paint was cheap and easy as they sell 1 oz. bottles for around a buck and I needed about six. The straw material that would form the bow was a mystery, so I showed a picture of what I was looking to a salesperson who called someone else who replied on the radio “Are you looking for raffia?” We looked at each other and shrugged since we didn’t know what raffia was, so she found out where and we looked and, sure enough, I was looking for raffia! I learned a new word at the craft store!
Now it was time to paint. I had to do a bit of mixing, but basically it was just painting the front and edges with the acrylic and letting it dry. After that was completely dried, I hit each of the pieces with a rotary sander, 80 grit, and roughed them up to weather the boards as well as round the edges a bit to make them look a bit more aged.
While all that was drying, I designed my pumpkin leaves in Affinity Designer and did a bit of prototyping so I could cut them on my Glowforge. I kicked that off and let it run for a couple hours (etching the veins was time consuming, cutting is fast). I used some 5mm plywood for the leaves which I painted a leafy green, let dry and then covered with blue painters tape to the front face, both to protect the paint, but also to mask it and make it easier to paint in the veins after.
Once they were cut, I put down a layer of a dark green for the veins and let them dry. After that, I simply removed the masking tape and I had leaves!
A trip to my home improvement store got me the copper (8 gauge wire by the foot) that I wanted for the vines. My plan was to simply wrap a length around a 1″ dowel and then stretch them using some vice grips in to the shape I wanted and this worked like a charm.
Now it was time for assembly, which was simple as well. I used some wood glue and screws on the back to assemble the wood. I used to 5 minute epoxy to secure the vine in to a small hole on the side of the back of the step. Finally, I tied a bow from the raffia and attached that. Repeat a total of four times and I was done!


This was a pretty quick project and fun. I enjoyed making my own spin on a project and it came out pretty much as I pictured and I didn’t really have any moments where I didn’t feel like I had the project well in hand, which is rare for me!
Total costs for this project were something like:
- Cedar Board – $3.50
- Paint – $4
- Copper – $1
- Raffia – $0.25
- Plywood for Leaf $0.25
So, call it around a $10 project. Total time to complete once the design work was out of the way was probably a couple hours of actual work (not counting drying time, laser cutting time, etc).
As I try to place a value on something like this, it’d need to be around $20 to cover my time at the most basic level. I was reading an article where a maker made a general claim that a project should be priced around 3x materials, which seems arbitrarily specific, but not an unreasonable guide. That having been said, I don’t know whether this would sell at $30.
Regardless, another fun project done!


0 Comments